Stamp design online
In this step you can define the form of the stamp. You can choose between countless fonts, font size, alignment and other parameters of the stamp. An indisputable advantage is the automatic check - the system will not let you go on if the stamp is not legible or if there might be another problem in the subsequent production of the stamp. Alternatively, upload your graphics directly into the system.
Basic editing
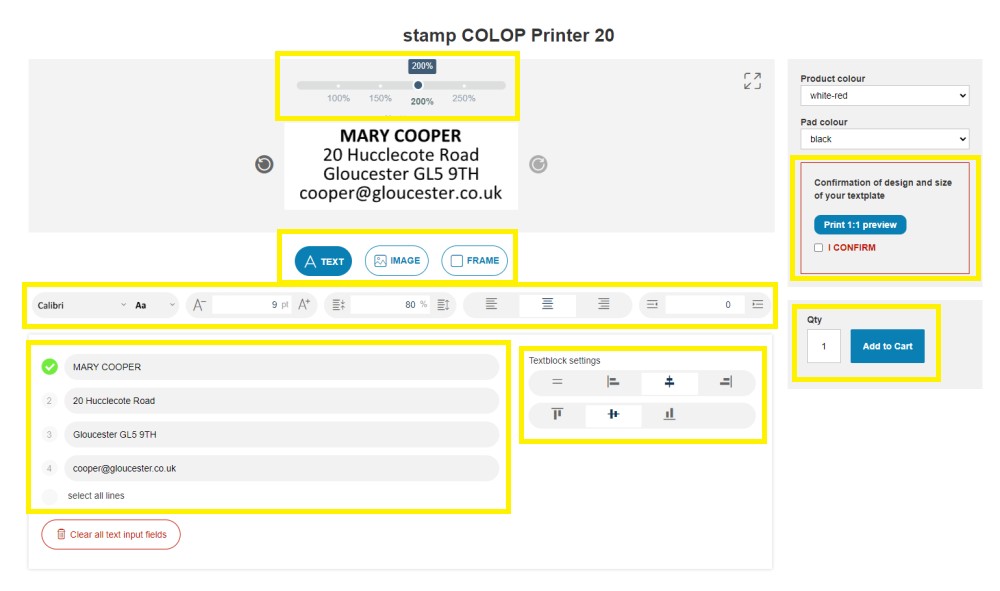

Text editing options (top panel):
-
Font (Calibri): A dropdown menu for selecting the font.
-
Font size: A numeric field with the value "9 pt" for setting the font size. There are also "A-" and "A+" buttons for decreasing/increasing the font size.
-
Character spacing (kerning): A field with a percentage value "80 %" and "A-" and "A+" buttons for adjusting the spacing between characters.
-
Text alignment: Icons for text alignment (likely left, center, right, justify).
Text input fields and line management:
-
Line 1: An input field with the text "John Doe" and a green "checkmark" icon, which may indicate that the line is active or valid.
-
Line 2: An input field with the text "Unit 90, Barretts G.".
-
Line 3: An input field with the text "Birmingham B66".
-
"select all lines": A link or button to select all lines.
-
"Clear all text input fields": A button with a trash can icon to clear all entered text.
Textbox settings:
-
Horizontal alignment of the text block: Icons that likely allow horizontal alignment of the entire text block (e.g., left, center, right, justify).
-
Vertical alignment of the text block: Icons that likely allow vertical alignment of the entire text block (e.g., top, middle, bottom).
-
Add line: An icon with a plus sign to add a new line to the text block.
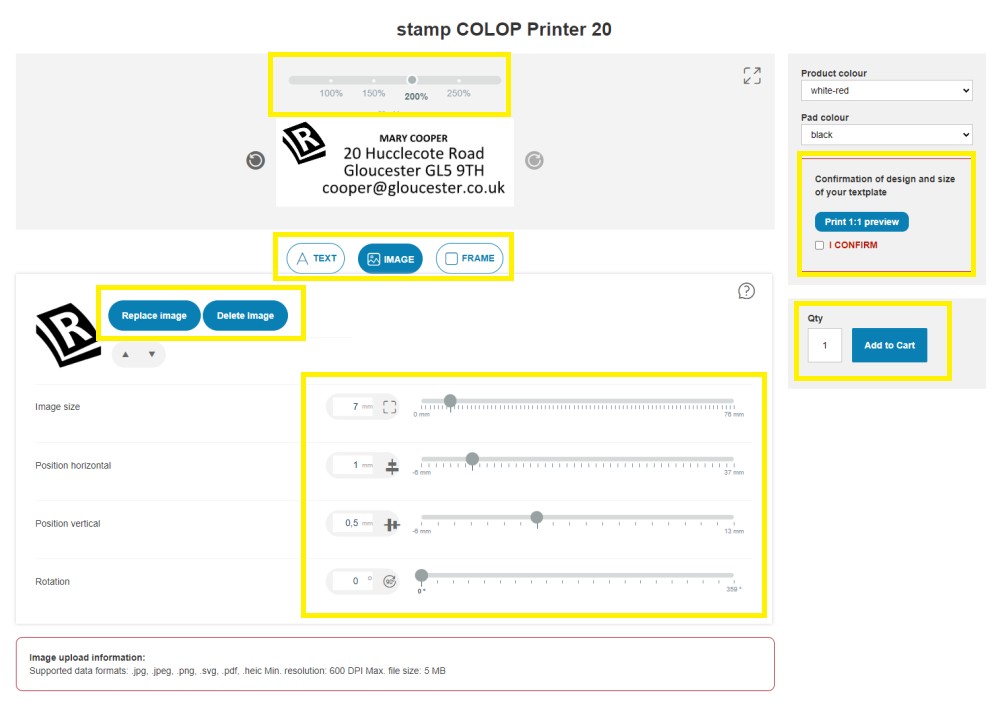
Editing of your logo graphics
-
Image preview: A small preview of the currently uploaded image on the left.
-
Image management buttons:
-
"Replace image": A button to upload a new image and replace the existing one.
-
"Delete Image": A button to remove the currently inserted image.
-
-
Up/down arrows: Next to the image preview are small arrows, which could be used to change the layer order if multiple objects could be inserted, or for fine-tuning the position.
-
Image settings (with sliders and numerical inputs):
-
"Image size": A field with the value "18.4 mm" and a slider for adjusting the image size. Next to the numerical field is a lock icon, indicating that the aspect ratio can be maintained. The adjustment range is from 0 mm to 54 mm.
-
"Position horizontal": A field with the value "4.3 mm" and a slider for adjusting the horizontal position of the image. The range is from -17.4 mm to 26 mm.
-
"Position vertical": A field with the value "0.5 mm" and a slider for adjusting the vertical position of the image. The range is from -8 mm to 9 mm.
-
"Rotation": A field with the value "0°" and a slider for adjusting the rotation angle of the image. The range is from 0° to 359°.
-
-
Image upload information: At the bottom of the screen, there's a red-bordered box providing details on supported formats and image requirements:
-
Supported data formats: .jpg, .jpeg, .png, .svg, .pdf, .heic.
-
Minimum resolution: 600 DPI.
-
Max file size: 5 MB.
-
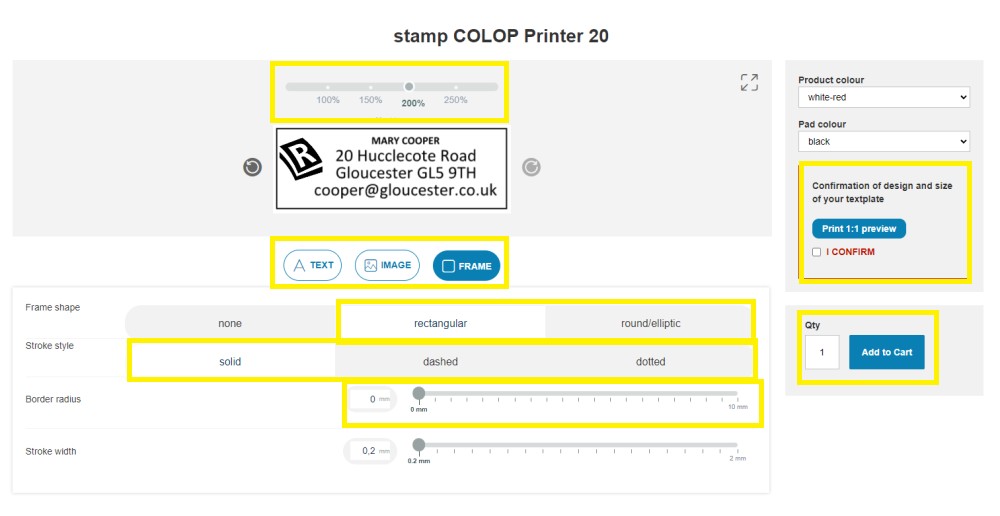
Adding and editing a frame
-
Frame shape: Three options for selecting the frame shape:
-
"none": No frame will be used (currently selected).
-
"rectangular": Creates a rectangular frame.
-
"round/elliptic": Creates a round or elliptical frame.
-
-
Stroke style: Three options for selecting the line style of the frame:
-
"solid": A solid, uninterrupted line (currently selected).
-
"dashed": A dashed line.
-
"dotted": A dotted line.
-
-
Border radius: A field with the value "0 mm" and a slider for adjusting the roundness of the frame corners. The adjustment range is from 0 mm to 5 mm.
-
Stroke width: A field with the value "0.2 mm" and a slider for adjusting the thickness of the frame line. The adjustment range is from 0.2 mm to 2 mm.